Monday, August 10, 2015

Fantasy Cave Environment - Final Rock Bakes

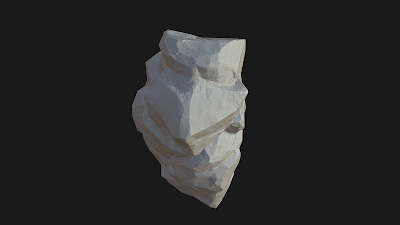
With being happy with the way the normal bake came out, I was free to move on to baking the rest of the textures I would need before I could begin the albedo. From xNormal I will bake a cavity, height, curvature, and ambient occlusion map, although I may let NDO create a curvature map based on the normal map. xNormal does a great job on all of these, although its AO map sometimes is a little light but a quick levels adjustment in Photoshop will fix that up.

Once these are all baked I can then port them in to UE4 to take a look. My only mistake was I did not flip the channels when baking in xNormals for the normal, so they were actually inverted inside UE4, but instead of re-baking it, you can just use a constant3 node set to 1, -1, 1 and multiple it by your normal to simply invert the channels. 

Next step will be working on the albedo, and then an actual material creation in UE4 utilizing all the maps. 


Sunday, August 9, 2015

Fantasy Cave Environment - Low Poly and Normal Bakes

I got to a point where I was happy with how my high poly had turned out, and while there is always something that can be made better, it is important to remember that you also need to finish projects as well.

Once I finish a high poly, I will export it out to serve as my detailed mesh for baking. Then, instead of jumping right to decimation master, I will actually dynamesh the mesh down to about 1 or 2 million polys. The reason for this is I don't need the high level of detail for my low poly, so by using dynamesh to reduce it first, I can save a lot of time during the pre-process step of decimation master. You can literally go from waiting a few minutes or more to only waiting 10 seconds or so simply by throwing in a quick dynamesh to reduce the polycount.

Once the process is complete, I will play around with tri-counts for the final low poly until I get something I am satisfied with that fits within the polygon budget for the environment. Once that's done I export it to Maya for a final cleanup as decimation master often times creates geometry with artifacts or holes, and often times some overlapping vertices.

Once everything is cleaned up, I start by deciding where my cuts for my uv's are going to go, then go through my least favorite part of unwrapping the mesh. Rocks are always a tricky thing to unwrap simply because you have such random geometry, and no two unwraps are ever the same. I generally try to keep my seams as minimal as possible, but sometimes you need to make more cuts for less distortion on the final mesh.

Last step is to export the final unwrapped lowpoly, bring both it and the highpoly in to Xnormals and start to bake.

For this rock I decimated down to about 1500 tris, a tad higher than I would normally use if this was going in to a game, but seeing this will just be for a portfolio the count will be fine.


Thursday, August 6, 2015

Fantasy Cave Environment - ZBrush Rock Sculpting

I figured the best place to start with the highpoly for this environment would be on the rocks as they serve the majority of the foundation in the scene. I began by creating a simple rectangle in Maya that was roughly the length, width, and height that I will want the final rock to be, subdivide it so its quads are even, and then export in to ZBrush.

Once in ZBrush I select the trim smooth border brush with a focal shift of about -83 and a very large size and begin to quickly and roughly chip away the blockiness of the imported rectangle. The trick is to stay at a very very low polycount during this stage, using dynamesh when needed but never going very high on the polycount. I will then spend some time appending the same shape to the model, using dynamesh, and sculpting, over and over until I have a rock formation that has an interesting silhouette from all sides. Because I will be using custom rocks for this scene instead of just tiling textures, it is extremely important that the rocks are interesting with viewed from all angles, this way I can duplicate, rotate, and scale the same rock many times and give the illusion that it is a lot of various rocks instead of just one.

Next I will dynamesh one last time to make sure I have a clean topology, and then I will subdivide up to 4-5 million polygons. While going over this might give you greater detail on a very zoomed in level, a lot of those details won't wind up coming over in your bake anyways, so I find 4-5 million gives you good control and performance while still offering enough polygons to get some great detail in the mesh.

I then work on detailing the mesh with various alphas, applying noise, using morphs, and then lastly adding in cracks and very small detail.


Fantasy Cave Environment - UE4 Blockout

Once I got the blockout done in Maya I began moving it in to Unreal to make sure everything still looked good and everything was proportionate.


I felt the total environment was a little too small, so I decided to add a second smaller island between the start point and the obelisk. I also grabbed one of the pre-made water textures from Unreal to test  what it would look like down on the lower area of the environment.

Fantasy Cave Environment - Maya Blockout

Now that I have a little spare time, I thought it was time to begin working on a new environment for my portfolio. Personally I feel that it is no longer reflective of the level of work I am capable of as I have learned a great deal since the work in it was completed.

I started by concepting out an idea, a mysterious cave littered with old stone ruins, and in the center, a large obelisk chained to four pillars. Below you can see the blockout I created to get down the idea in Maya. I have gotten in the habit of always creating a grey-box whenever I have an idea for a new environment I would like to create. This way I can translate what I see in my imagination down in to a 3d space, and make corrections to things that don't look right once in the space.


As I will be using UE4 for this environment, I exported the default character mesh out of the engine and ported it in to Maya to use as a scale reference. This way I can make sure everything is proportionate and looks correct before I begin the detailed modeling process.

As you can see everything is still very simple and made mostly of just base primitives. The empty area around the scene will be filled in rocks to create the inside of the cave once I get to that stage.